
Building A Chicken Coop
Building a chicken coop can be one of the most rewarding things you can do for your family. Choosing the right chicken coop design for your needs can make a big difference whether or not your experience with backyard chickens is a positive one. I have seen many backyard chicken coops that look cost effective but end up being very hard to maintain and clean, not to mention poorly made materials which cause them to warp in a short period of time.
Many chicken coop plans are too small for the amount of chickens people put in them. There are some chicken coop plans that are so low to the ground, you would need to clean it out while kneeling down. Growing up with chickens has given me an advantage to know what they need.
Our chicken coop plans are designed to make poultry maintenance easier and create a healthy environment. Hens that have enough space and are comfortable, lay more eggs! Clean Coops are easy to maintain and will stay clean which reduces disease and improves the overall health of your chickens.
Why You Should Build A Clean Coops Design
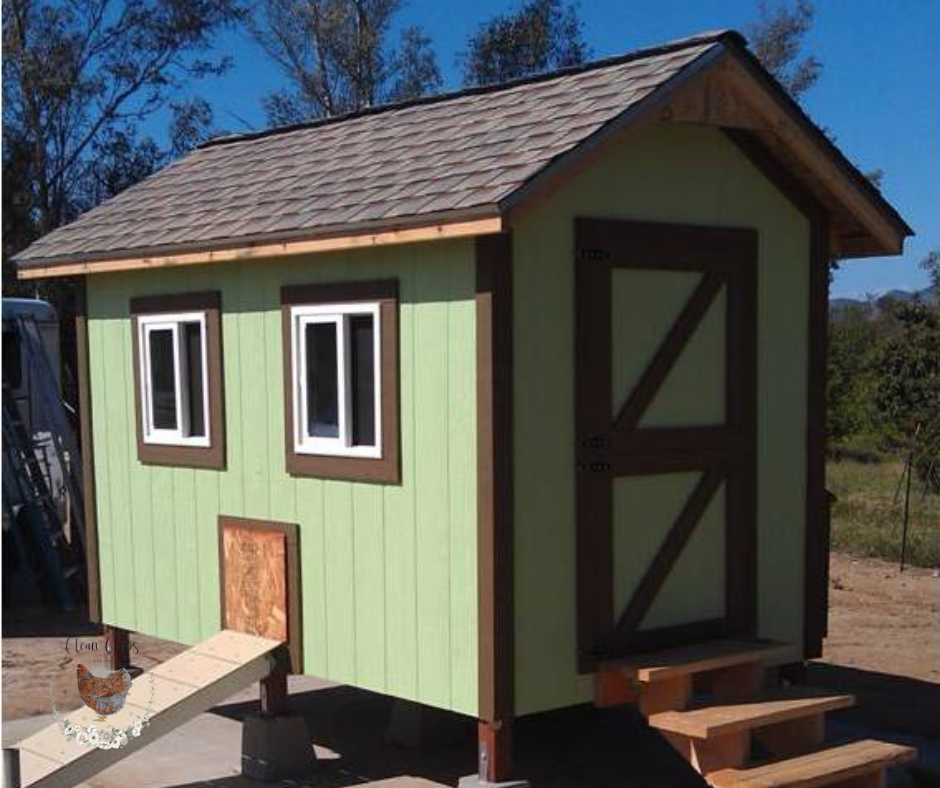
Height of the coop inside and out – Our coops are thoughtfully designed to ensure your hens have plenty of space to roost comfortably while still enjoying ample headroom. After all, you’ve heard the phrase “cooped up”—chickens feel the same way if they don’t have enough room to move freely!
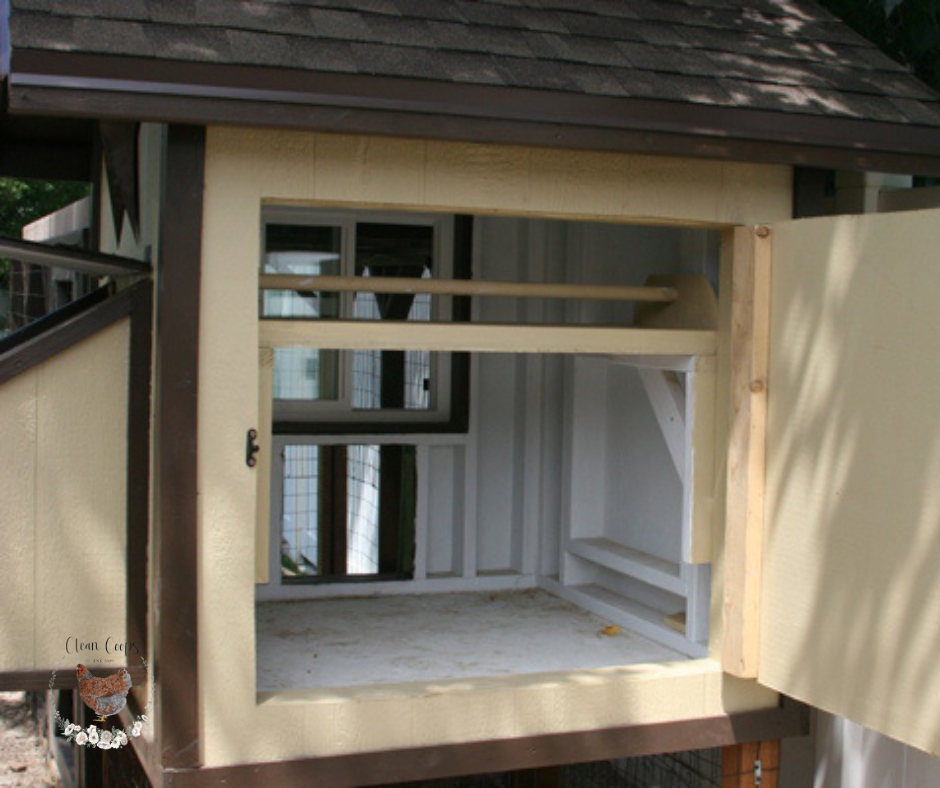
We also considered your convenience when it comes to cleaning and maintenance. The coop is raised off the ground, providing shade and a cool retreat for your flock while allowing for easy access when it’s time to clean. The large, wide doors swing open completely, making it effortless to refresh food and water, replace shavings, and keep the coop in top shape.
Height truly makes all the difference—for both you and your chickens. You're welcome!

Size – Our chicken coop plans are carefully designed to accommodate the highest number of chickens while utilizing the least amount of square footage, ensuring an efficient yet comfortable living space. We prioritize a balance between space efficiency and the well-being of your flock, preventing overcrowding while making the most of every inch. One of the key features of our design is the placement of nesting boxes outside the main coop structure. This innovative approach frees up the entire interior floor space, allowing your chickens more room to move, scratch, and roost comfortably. By maximizing floor space, we create a healthier environment that promotes natural behaviors and reduces stress among your birds. Whether you have a small backyard flock or a larger homestead setup, our coops are engineered to provide a functional and cozy space without compromising on efficiency!

Ventilation – Chicken coops need good ventilation without getting drafty. Proper air flow is essential to allow ammonia from the urine and feces to escape. We make sure both ends of the chicken coop have vents to keep air flowing. To make sure your hens are protected from the wind, position the vents of the chicken coop the opposite direction from direct wind flow. This way air can get in and out without blowing directly on the hens, especially at night. Nail predator proof screens inside the chicken coop so you can open the windows on hot summer nights. Open the doors occasionally during the day to increase air flow. Check the floor for any large cracks or places where draft can get in. I wanted my floor to be free from draft under the chicken coop, so I caulked any cracks all around the perimeter of the floor and nests with exterior grade waterproof caulk. This is totally optional. A good thick layer of pine shavings only, will also do the trick!
Floor – While easy cleaning is important, choosing the right flooring is crucial for your chickens' safety and comfort. Avoid slippery surfaces like certain waterproof materials or newspaper for chicks, as they can cause leg injuries. Some waterproof floors trap moisture and odors, making the coop too hot in summer, while improperly installed vinyl can lead to wood rot.
Our coops use wood floors, which dry easily and stay protected with a thick layer of shavings to absorb moisture. Wire floors can be difficult to clean if the holes aren’t large enough for waste to pass through. Since chicken manure hardens and sticks, shavings work best for absorption and cleanliness.
For extra protection, sprinkle
Food Grade Diatomaceous Earth (DE)
on the floor and in corners before adding fresh shavings—it helps control moisture and mites, keeping your coop drier and easier to maintain.

Light – I have found it to be important to have proper light in a chicken coop to encourage better laying. It also helps the hens not feel so closed in, if they can see outside. Our chicken coops are designed with windows to help keep it bright and happy first thing in the morning! If you are able to position the windows toward the east, the light can enter the chicken coop and wake the girls up! No matter what side the windows are facing, it still helps to have windows. Real windows can be used (ones that slide sideways are best for long term use) or to save more money, use plexiglass. We got our windows at a clearance window boneyard for $25 each. Real windows are better for insulation.
Wood Type – There are a few different kinds of wood you can use. Decide what the exterior will look like, what kind of finishes you want and textures. Plywood comes in different thickness and is commonly used. There are exterior grades of plywood as well as finishes. OSB (Oriented Strand Board) is also used, which costs a little less. OSB is an engineered wood that is created by layering strands and flakes of wood together. Some wood sheets have a rough and smooth side. Position the smooth side on the outside if you want to paint your chicken coop. Any wood texture will work if you plan on covering it up with siding or paneling. Choose shingles, tin or metal for your roof. It is just like building a little house.

Nest Boxes – Wood works great because it is economical to build and stays dry if taken care of properly. We like to make it even easier to clean by using plastic storage bins and cutting out the front using a pair of wire snips. This is an easy clean up if an egg breaks or if shavings need to be replaced. Eggs stay clean and the nest area is private and dry. Shavings used to line the next box are best in my opinion. It cushions the eggs, absorbs moisture and is softer for the hens. The number of nests will affect how your hens lay their eggs. If there are not enough nests, you will end up with eggs on the floor or around the yard. It is good to have 1 nest box for every 4-5 laying hens. This means you can have 12 chickens and only need 3-4 nest boxes. We like having extra nests in our chicken coops for hatching out chicks. Chickens like to take turns laying eggs throughout the day and quite often switch what nest they will lay in especially as seasons change. Some hens finish laying as late as 6pm so you only need to gather the eggs once in the evening, (with the exception of freezing temperatures, gather eggs as soon as you can after the chickens lay so the eggs won’t crack.) Our chicken coop plans are designed with the nests away from the roosting bar and one step up from the main floor (like the Daisy and Bella) so manure cannot be tracked inside the nest area. Make sure nests are available no later than when hens are 15 weeks old so they have a place to lay their eggs…otherwise hens will lay anywhere on the ground. (Some hens, like a Sexlink, start laying as early as 16 weeks!)
Follow Us
Company

More
Legal
Copyright 2026. Clean Coops. All Rights Reserved.
Why You Should Build A Clean Coops Design
Height of the coop inside and out – Our coops are thoughtfully designed to ensure your hens have plenty of space to roost comfortably while still enjoying ample headroom. After all, you’ve heard the phrase “cooped up”—chickens feel the same way if they don’t have enough room to move freely!
We also considered your convenience when it comes to cleaning and maintenance. The coop is raised off the ground, providing shade and a cool retreat for your flock while allowing for easy access when it’s time to clean. The large, wide doors swing open completely, making it effortless to refresh food and water, replace shavings, and keep the coop in top shape.
Height truly makes all the difference—for both you and your chickens. You're welcome!
Size – Our chicken coop plans are carefully designed to accommodate the highest number of chickens while utilizing the least amount of square footage, ensuring an efficient yet comfortable living space. We prioritize a balance between space efficiency and the well-being of your flock, preventing overcrowding while making the most of every inch. One of the key features of our design is the placement of nesting boxes outside the main coop structure. This innovative approach frees up the entire interior floor space, allowing your chickens more room to move, scratch, and roost comfortably. By maximizing floor space, we create a healthier environment that promotes natural behaviors and reduces stress among your birds. Whether you have a small backyard flock or a larger homestead setup, our coops are engineered to provide a functional and cozy space without compromising on efficiency!
Ventilation – Chicken coops need good ventilation without getting drafty. Proper air flow is essential to allow ammonia from the urine and feces to escape. We make sure both ends of the chicken coop have vents to keep air flowing. To make sure your hens are protected from the wind, position the vents of the chicken coop the opposite direction from direct wind flow. This way air can get in and out without blowing directly on the hens, especially at night. Nail predator proof screens inside the chicken coop so you can open the windows on hot summer nights. Open the doors occasionally during the day to increase air flow. Check the floor for any large cracks or places where draft can get in. I wanted my floor to be free from draft under the chicken coop, so I caulked any cracks all around the perimeter of the floor and nests with exterior grade waterproof caulk. This is totally optional. A good thick layer of pine shavings only, will also do the trick!
Floor – While easy cleaning is important, choosing the right flooring is crucial for your chickens' safety and comfort. Avoid slippery surfaces like certain waterproof materials or newspaper for chicks, as they can cause leg injuries. Some waterproof floors trap moisture and odors, making the coop too hot in summer, while improperly installed vinyl can lead to wood rot.
Our coops use wood floors, which dry easily and stay protected with a thick layer of shavings to absorb moisture. Wire floors can be difficult to clean if the holes aren’t large enough for waste to pass through. Since chicken manure hardens and sticks, shavings work best for absorption and cleanliness.
For extra protection, sprinkle
Food Grade Diatomaceous Earth (DE)
on the floor and in corners before adding fresh shavings—it helps control moisture and mites, keeping your coop drier and easier to maintain.
Light – I have found it to be important to have proper light in a chicken coop to encourage better laying. It also helps the hens not feel so closed in, if they can see outside. Our chicken coops are designed with windows to help keep it bright and happy first thing in the morning! If you are able to position the windows toward the east, the light can enter the chicken coop and wake the girls up! No matter what side the windows are facing, it still helps to have windows. Real windows can be used (ones that slide sideways are best for long term use) or to save more money, use plexiglass. We got our windows at a clearance window boneyard for $25 each. Real windows are better for insulation.
Wood Type – There are a few different kinds of wood you can use. Decide what the exterior will look like, what kind of finishes you want and textures. Plywood comes in different thickness and is commonly used. There are exterior grades of plywood as well as finishes. OSB (Oriented Strand Board) is also used, which costs a little less. OSB is an engineered wood that is created by layering strands and flakes of wood together. Some wood sheets have a rough and smooth side. Position the smooth side on the outside if you want to paint your chicken coop. Any wood texture will work if you plan on covering it up with siding or paneling. Choose shingles, tin or metal for your roof. It is just like building a little house.
Nest Boxes – Wood works great because it is economical to build and stays dry if taken care of properly. We like to make it even easier to clean by using plastic storage bins and cutting out the front using a pair of wire snips. This is an easy clean up if an egg breaks or if shavings need to be replaced. Eggs stay clean and the nest area is private and dry. Shavings used to line the next box are best in my opinion. It cushions the eggs, absorbs moisture and is softer for the hens. The number of nests will affect how your hens lay their eggs. If there are not enough nests, you will end up with eggs on the floor or around the yard. It is good to have 1 nest box for every 4-5 laying hens. This means you can have 12 chickens and only need 3-4 nest boxes. We like having extra nests in our chicken coops for hatching out chicks. Chickens like to take turns laying eggs throughout the day and quite often switch what nest they will lay in especially as seasons change. Some hens finish laying as late as 6pm so you only need to gather the eggs once in the evening, (with the exception of freezing temperatures, gather eggs as soon as you can after the chickens lay so the eggs won’t crack.) Our chicken coop plans are designed with the nests away from the roosting bar and one step up from the main floor (like the Daisy and Bella) so manure cannot be tracked inside the nest area. Make sure nests are available no later than when hens are 15 weeks old so they have a place to lay their eggs…otherwise hens will lay anywhere on the ground. (Some hens, like a Sexlink, start laying as early as 16 weeks!)
Follow Us
Company
More
Legal
Copyright 2026. Clean Coops. All Rights Reserved.